

How To Create Web Service Api In Java
In the modern world of interconnected software, web applications have become an indispensable asset. Foremost among these web applications is the Representational State Transfer (REST) web service, with Java becoming one of the most popular implementation languages. Within the Java REST ecosystem, there are two popular contenders: Java Enterprise Edition (JavaEE) and Spring. While both have their strengths and weaknesses, this article will focus on Spring and create a simple order management RESTful web application using Spring 4. Although this management system will be simple compared to the large-scale RESTful services found today, it will nonetheless demonstrate the basic thought process, design decisions, and implementation tests required to create a Level 3 (hypermedia-driven) Spring REST web service.
By the end of this article, we will have created a fully functional Spring REST order management system. While the source code illustrated in this article covers the essential aspects of the order management system, there are other components and code (such as test cases) that support the main service that are not shown. All of the source code, including these supporting aspects, can be found in the following GitHub repository:
The source code snippets in this article are not in-and-of-themselves sufficient for creating a fully functioning REST web service. Instead, they serve as a snapshot or reflection of the source code contained in the above repository. Therefore, as we walk through each step in creating our REST service, the source code in the above repository should be visited consistently and used as the authoritative reference for all design and implementation choices. For the remainder of this article, when we refer to our order management system, we are actually referring to the Spring REST service contained in the above repository.
Prerequisite Knowledge
It is expected that the reader has at least a novice understanding of dependency injection (DI), particularly DI using the Spring framework. Although we will explore the DI framework configurations used and the DI components utilized in our order management system, it is assumed that the reader has at least a conceptual understanding of the need for and premise of DI. For more information on DI in Spring, see the Spring Framework Guide and DZone's Spring Configuration Refcard.
This article also assumes that the reader has a foundational understanding of REST and RESTful web services. While we will deep dive into the design and implementation intricacies of creating a REST web service in Spring, we will not focus on the conceptual aspects of REST (such as the use of an HTTP GET or POST call). For more information on RESTful web services, see DZone's Foundations of RESTful Architecture Refcard and RESTful Web Services by Leonard Richardson and Sam Ruby.
Development Cycle and Tools
Our order management system was created using Test Driven Development (TDD), where tests were created first and each design decision and implemented component was focused on passing the created test cases. This not only resulted in a simple set of classes, but a more easily distinguishable set of components. For example, persistence logic and domain logic are not intertwined. Apart from the process used to create the service, there are also numerous tools used to build, test, and deploy the system, including:
- Spring Model-View-Controller (MVC): the core framework of our web service; this framework provides the necessary annotations and structure required to create our REST endpoints and serve these endpoints over HTTP.
- Spring Boot: a convention-over-configuration framework that removes a majority of the boilerplate Spring code and configuration; this framework allows us to develop and launch of web service with a fraction of the hassle of a standard Spring web service.
- Apache Maven: a build and dependency management tool that is used to build, execute tests, and package our web service into a Java Archive (JAR) file that will be executed to run our RESTful web service.
- JUnit: an automated unit testing framework that will be used for unit and integration tests, as well as to automate the execution of our acceptance tests.
- Cucumber: an automated acceptance testing framework that allows us to create text-based acceptance criteria and exercise our web service to ensure that all top-level functionality is correct during the development of the service.
- Java 8: at the time of writing, the latest version of Java; we will utilize the streams API to reduce the code needed to filter through the domain objects in our system.
- GitHub: a free hosting service for Git-based projects; our web service will be hosted here and the commit history for the web service can be viewed here.
- Travis Continuous Integration (CI): a free continuous integration platform that executes the automated tests in order of web service each time a commit is pushed to our GitHub repository; the build and test history of our web service can be viewed here.
Although we are using a wide array of frameworks and tools, each has a very important task when building our web service. Before we jump into the implementation, though, we first need to devise a design for our order management system.
Designing the Web Service
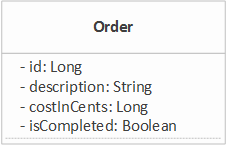
The first step to designing our web service is deciding on what we want the service to accomplish. Since we are required to process orders, the definition of an order (i.e. creating a domain model) is a good place to start. Each order that we process should have an identifier (ID) so that we can uniquely point to it, a description that describes the order in a human-readable form, a cost, and a completion status.
Note that the cost is not a trivial issue to deal with in software: It is very easy to lose track of cents and make simple rounding errors. In order to avoid these subliminal issues, we will simply store the cost for our order in cents. This allows us to remove the decimal place and perform simple arithmetic without worrying that we will lose a penny in the mix.
Using this simple definition of an order, we devise the following domain model:
With our order designed, we can move onto designing how we will expose our orders through our RESTful web service. Using the standard HTTP verbs, we can quickly come up with a set of REST endpoints that cover the usual Create, Read, Update, and Delete (CRUD) operations:
| HTTP Verb | URL | Description |
GET | /order | Obtains the list of all orders currently created in the system. If the list is successfully obtained, the list of existing orders is returned, along with an HTTP |
POST | /order | Creates a new order. This request should carry a request body that includes the data that should be associated with the newly created order. If the order is created, an HTTP 201 (Created) status is returned along with the newly created order in the response body. |
GET | /order/{id} | Obtains the order associated with the given ID. If no order exists, an HTTP 404 (Not Found) status is returned. If the order can be found, an HTTP 200 status is returned and the response body contains the information associated with the order. |
PUT | /order/{id} | Updates an existing order. If no order with the given ID can be found, an HTTP 404 status is returned. If an order exists with the given ID and the request body contains valid updates to the order, the order is updated and the updated order is returned in the response body, along with an HTTP 200 status. |
DELETE | /order/{id} | Deletes an order with the given ID. If no order exists, an HTTP 404 status is returned. If the order exists, it is deleted, and an HTTP 204 (No Content) status is returned. |
It is important to note that we should not simply enumerate the REST endpoints we intended to create, but also include the expected behavior if the endpoint successfully completes the request or if it fails to do so. For example, if a client requests to update a non-existent order, we should return a 404 error to inform the client that this resource does not exist. If we successfully update the resource, we should return a 200 status to inform the client that its request was successfully completed.
At this point, it is also useful to think about what the response bodies for the various REST endpoints will look like. Due to its simplicity, we will consume Javascript Object Notation (JSON) objects in the request bodies we receive and produce JSON objects in the response bodies we send, respectively. For example, if we follow our domain model, the response body for getting an order with a specified ID would resemble:
{ "id": 1, "description": "Some sample order", "costInCents": 250, "complete": false } We will see later in this article that other attributes, such as hypermedia links, will also be included. Irrespective of hypermedia link, thinking about the expected request and response bodies for our REST endpoints allows us to devise test cases in advance that ensure we are handling and producing the expected results when we implement our REST endpoints.
With our domain model and REST endpoints defined, we can move to the last piece of the puzzle: How to store our orders. For example, when we create a new order, we need some means of storing that order so that a client, at some future time, can retrieve the created order.
In a true REST web service, we would decide on the best database or persistence framework that supports our domain model and design a persistence layer interface to use to interact with this database. For example, we could select a Neo4j database if our data was well-suited for a graph domain model, or MongoDB if our domain model fits nicely into collections. In the case of our system, for simplicity, we will use an in-memory persistence layer. Although there are various useful in-memory databases, our model is simple enough to create the in-memory database ourselves. In doing so, we will see the basic functionality of a database attached to a REST service, as well as understand the simple interfaces that are common among repositories in RESTful services.
Abstracting Our Design
At this point in our design, we have three discrete sections of our system: (1) a domain model, (2) a series of REST endpoints, and (3) a means of storing our domain objects, or a persistence layer. This set of three sections is so common, it has its own name: A 3-Tier application. Whatsmore, Martin Fowler has written an entire book, Patterns of Enterprise Architecture, on the patterns that surround this application architecture. The three tiers in this architecture are (1) presentation, (2) domain, and (3) data source (used interchangeably with persistence layer). In our case, our REST endpoints map to the presentation layer, our order domain model maps to the domain layer, and our in-memory database maps to the data source layer.
Although these three layers are usually depicted with one stacked on top of the other, with the presentation layer at the top, closest to the user, the domain layer in the middle, and the data source layer on the bottom, it can be more helpful to look at this architecture in terms of its interactions, as illustrated in the following diagram.
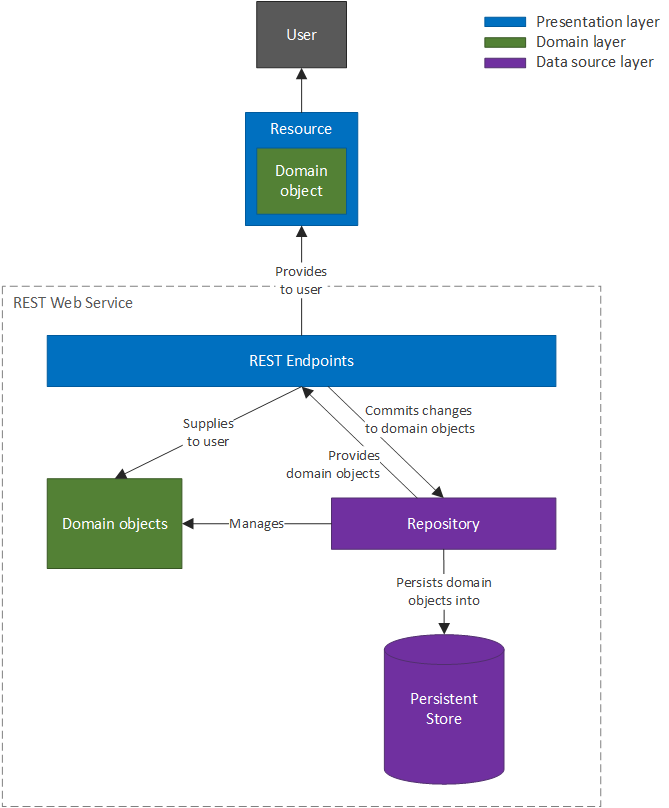
There is an important addition that is made to our architecture: Domain objects are not sent directly to the user. Instead, they are wrapped in resources and the resources are provided to the user. This provides a level of indirection between the domain object and how we present the domain object to the user. For example, if we wish to present the user with a different name for a field in our domain model (say orderName instead of simply name), we can do so using a resource. Although this level of indirection is very useful in decoupling our presentation from the domain model, it does allow duplication to sneak in. In most cases, the resource will resemble the interface of the domain object, with a few minor additions. This issue is addressed later when we implement our presentation layer.
The resource object also provides an apt place for us to introduce our hypermedia links. According to the Richardson model for REST web services, hypermedia-driven services are the highest capability level of a REST application and provide important information associated with the resource data. For example, we can provide links for deleting or updating the resource, which removes the need for the client consuming our REST web service to know the REST endpoints for these actions. In practice, the returned resource (deserialized to JSON) may resemble the following:
{ "id": 1, "description": "Some sample order", "costInCents": 250, "complete": false "_links": { "self": { "href": "http://localhost:8080/order/1" }, "update": { "href": "http://localhost:8080/order/1" }, "delete": { "href": "http://localhost:8080/order/1" } } } Given these links, the consumer is no longer required to build the URLs for the update, delete, or self-reference REST endpoints. Instead, it can simply use the links provided in our hypermedia-driven response. Not only does this reduces the logic necessary for interacting with our REST web service (no longer do the URLs need to be built), but it also encapsulates the logic for the construction of the URLs. For example, suppose we change our REST service to require a query parameter, such as sorting: if we provide the links to the consumer, we can adjust for that change, without making any changes to the consumer:
{ "id": 1, "description": "Some sample order", "costInCents": 250, "complete": false "_links": { "self": { "href": "http://localhost:8080/order/1?sorting=default" }, "update": { "href": "http://localhost:8080/order/1?sorting=default" }, "delete": { "href": "http://localhost:8080/order/1?sorting=default" } } } Although generating these links could be tedious and subject to a large number of bugs (i.e. what if the IP address of the machine hosting the web service changes?), the Spring Hypermedia as the Engine of Application State (HATEOAS, commonly pronounced hay-tee-os) framework provides numerous classes and builders that allow us to create these links with ease. This topic will be explored further when we delve into the implementation of our presentation layer.
Before moving to the implementation of our web service, we must pull our design together and devise a plan of action to create it. At the moment, we have a single domain object, Order, instances of whom will be persisted in an in-memory database and served up (within a resource) to clients using our REST endpoints. This design leaves us with four main steps:
- Implement the domain model
- Create the Order domain class
- Implement the data source layer
- Create an in-memory database
- Implement the CRUD operations for the Order domain class
- Implement the presentation layer
- Create the REST endpoints
- Create the Order resource
- Create assembler to construct an Order resource with proper HATEOAS links
- Pull the application together
- Create the main method that will run the application
In Part 2, we will work on implementing the data source and domain layers, which will lay the foundation for implementing the RESTful interface of our web service.
Originally published September 2017
Further Reading
Creating a REST Web Service With Java and Spring (Part 2)
Build a REST Web Service Using Spring
Step-by-Step Spring Boot RESTful Web Service Complete Example
Topics:
spring, mvc, web dev, java 8, rest web service
Opinions expressed by DZone contributors are their own.
How To Create Web Service Api In Java
Source: https://dzone.com/articles/creating-a-rest-api-with-java-and-spring
Posted by: keithbourfere.blogspot.com
0 Response to "How To Create Web Service Api In Java"
Post a Comment