

How To Create A Shape Layer In Photoshop
Among many powerful tools in Photoshop is the king of kings: the pen tool. This tool is shrouded by personal anecdotes of confusion and frustration. Although creating paths with the pen tool is difficult at first, the process becomes easier with practice and is well worth the effort. Every path is vector-based which means you can scale it larger or smaller without any quality loss.
But paths can be very frustrating if you don't know how to use them. I'd like to cover the process of converting a path into a shape layer. In case you didn't already know, shape layers are merely paths that can hold fills & outlines. This also means you can apply layer effects and even filters if you convert the same into a smart object. Note that a path is merely a series of points like an outline which can become a selection. It's the raw material of shapes but not quite a shape in-itself.
1. Drawing the Path
First create a new document and just draw any path on the canvas. You might draw a crazy random shape or you might take the time to design a simple icon. I've created a relatively flat checkmark which looks like this:

Note that you need to actually complete the path in order to create a shape. This means after creating the first anchor point you should place a few more on the document and bend/twist them as needed. Bring the shape all the way around back to where you started and click back onto the first anchor point to close the path. The pen icon will have a little circle next to it when you're about to close the path.
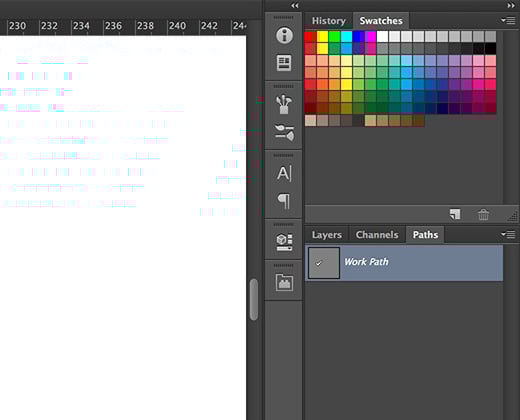
Afterwards you'll notice there's a completed path located in the paths palette. By default this is called a Work Path but you can rename it to save the path for later use.
2. Shape Time!
With the working path selected move up to the menu bar and click Layer -> New Fill Layer. Three new options will appear in a menu which determine how your shape turns out. The best choice is "Solid Color…" because that's the default for every shape.
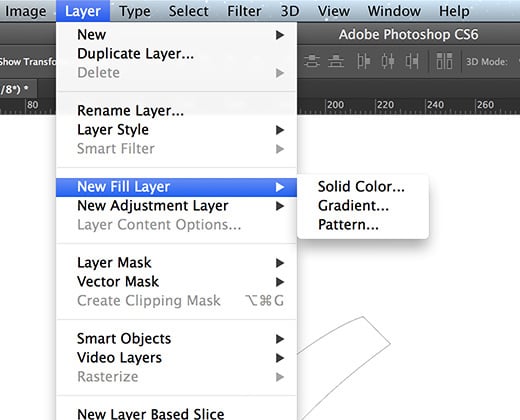
Even with a solid fill color you can still achieve a gradient or pattern background using layer effects. But if you want to try out the different methods feel free to experiment.
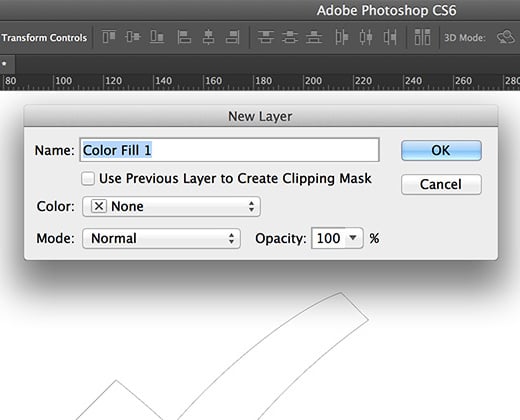
Once you click any of these choices(for now let's do solid color) a New Layer window appears. You might give this shape layer a name, opacity, or blend mode. But all of this stuff can be changed later so just hit OK and then you can choose the fill color. It'll default to your foreground color but feel free to change this if needed.
If you want to change the shape layer's fill color at a later point just double-click on the layer icon in the layers palette. Or you can choose one of the shape tools(doesn't matter which one) and while selecting the newly-created shape layer just change the fill option directly from the options bar.
3. Adding Effects
Once you have the shape layer it's easy to manipulate. You can choose from any of the layer effects to create details like drop shadows, textures, gradients, or similar options. Since the shape layer is a vector you can hit CTRL+T and transform the graphic to any size without quality loss. The layer effects will also scale accordingly.
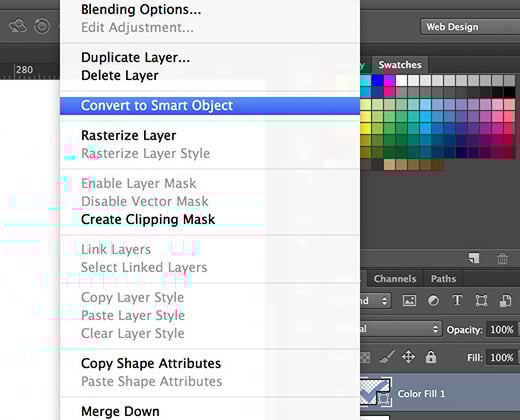
If you right-click on the shape layer and choose "Convert to Smart Object" the shape itself is now editable within a .PSB file. Much like the PSD(PhotoShop Document) file format the PSB(PhotoShop Big) contains pixel information which relates to filters, layer effects, graphics, and of course vector work. Sometimes you'll find PSB files as separate documents but in this case the PSB would saved within the PSD document. This allows you to add something called smart filters onto a vector item which would typically require destructive filters.
Basically a Smart Object is like a compartmentalized image stored within the main document. No data is lost between the shape layer to smart object conversion and there are quite a few benefits to using the smart object. It all depends on what you need to do with the shape.
Also keep in mind that your path should still be available in the paths palette. So if you decide to modify the shape's anchor points but need a different copy you can always rebuild a new shape layer from the original path by following the steps above.
How To Create A Shape Layer In Photoshop
Source: https://www.bittbox.com/culture/convert-paths-to-shapes-in-photoshop
Posted by: keithbourfere.blogspot.com
0 Response to "How To Create A Shape Layer In Photoshop"
Post a Comment